Monday, March 26, 2007

XBR Mockup system placement test

Heres the first chassis halve with what we expect to house in each section, The cpu will be switchable from slave to master modes to allow the two halves to act as one. The power cell in here is too big and 12volt, we most likely will switch it out for a 9.6 v LIPO cell for remote control planes or cars. The regulator is adjustable to take various power input's and the motors could be switched out to 9 volt high performance units with better gearing from remote control cars.
The two servos on top are for the camera and end effector and a full chassis would have a total of 4 servo ports on the top if the user wanted them. T viper is placed down the side of the battery closest to the camera, you can see the serial port connector sticking out a little from the edge of the chassis ( lower center), The ai2 screen would fit out through the top plate to allow user control, or mounted inside for increased protection during outdoor missions.

Sunday, March 25, 2007

XBR Chassis, MK1


Heres the latest on the chassis halves, as you can see from the photo the two pieces are nearly finished, the one closest to the camera still needs to be sanded and the sides and tops need fitting. Overall Im happy with the way this first mockup has turned out, this is made from foam construction board glued with liquid nails by selleys.
These weigh less then the same part made from laminated cardboard.

Thursday, March 22, 2007

Laminating 101


Here's a quick run down on the laminated pices, First we took five card sections and placed one on top of the other using a layer of contact adhesive between each one, make sure you dont stick it to the bench. Dont worry about the edges just make sure to get a good coating all over the face of the piece right up to the edge but not dripping over it or you will stick it to the press.
Now take the stack and place between two flat mdf or ply boards, place a heavy weight like some water bottles or bricks , around 5-10 kgs is fine depending on the firmness of the dard you use, on top of the pile and leave for around 10 mins , lift off the bricks and leave the board on top overnight to keep flat.
Now do this so you have 4 to six sections depending on how strong you want it to be, or even make up thicker ones with 10 or more layers. but watch the weight.
When its dry, trim the edges of the holes and sides and coat the inside of the corrugated card to reinforce it and help water proof the card, a final coat of glue over the whole pice then hung up to dry will make it last quite a while so your hard work dosent go down the drain.

XBR-001 Mock Up Part 1


We started laminating the card pieces into structural supports for the chassis today, at this stage we are still trying different ideas to speed construction and reduce costs. this version features three round "bays" for power and motors, with the brain housed in the body on top, the body section is the right height but will feature more rings. The head is just a token shell to judge size but may yet feature a similar under pinning skeleton for the dome structure. Ok, so you need to squint and turn off the lights to see a robot here, but its still early days and we want to document all the steps .

Tuesday, March 20, 2007

New POV Renders


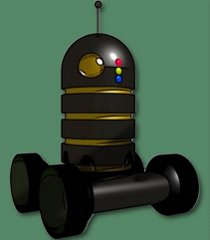
We have completed new files for POVray and now the rings are modeled as single entities that are then assembled into the required stacks. As the image shows the discs can be placed in diffrent patterns so robots can easily be identified by moving the colored discs up and down the stack creating unique patterns for identifacation.
The height of the robot can also be changed easily with this desig by adding or omitting rings. THese parts are modeled to scale and will be used in orthographic view to produce detailed CAD renders for input into milling or molding machines.
The design also allows construction from sheet materail and a suitable cutter like a laser or 2 axis mill cutter (CNC)

Stockpile For Mockup

 
Robot Modules
This is part of the pile of boxes we are using to create the first full size mockup , we need around 150-200 cut out pieces for the robot, so its been busy cutting and drawing the last few days.
Posted by Picasa

Monday, March 19, 2007

ARMY SEEKS COLABERATORS


With the project stepping up a gear its about time to increase the human factor. It's about time those poor robots got some help taking over the world...
So if you have anything that ou think might be of use to the project be it an idea or design aspect, or even wanting to propose an exsisting system you want to make sure will fit inside, then drop us an email or join the xbr-gag disscussion group and keep up to date on all the goings on.
No idea is too small ( but some may be too big!) so get those ideas out and dust them off. the open source army wants you.....